In the previous section, we almost complete the configuration setup.
Now, we will clarify how to add an item to tthe cart of the e-commerce shop.
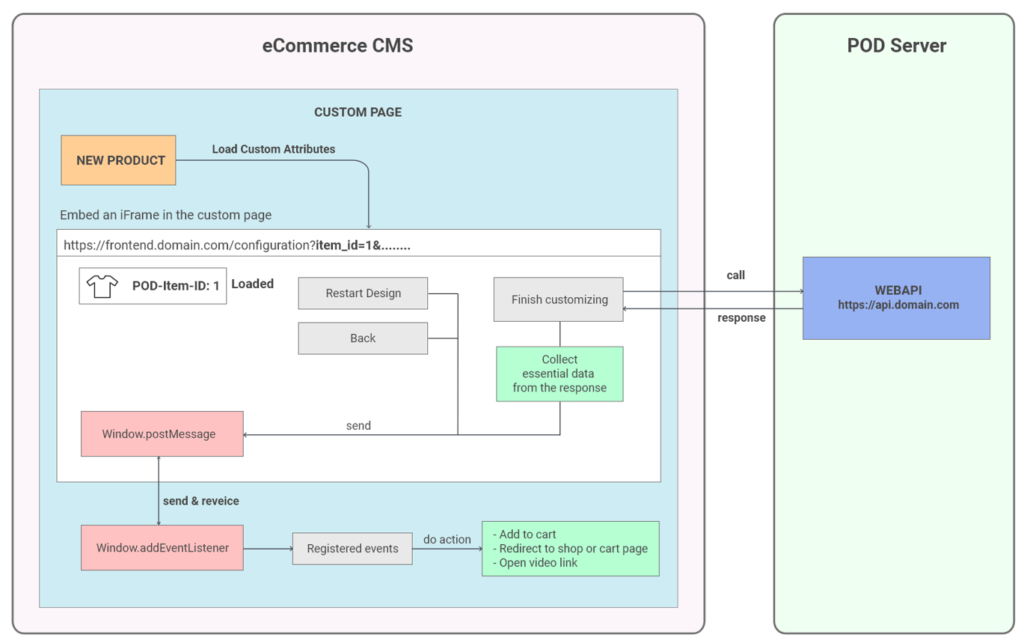
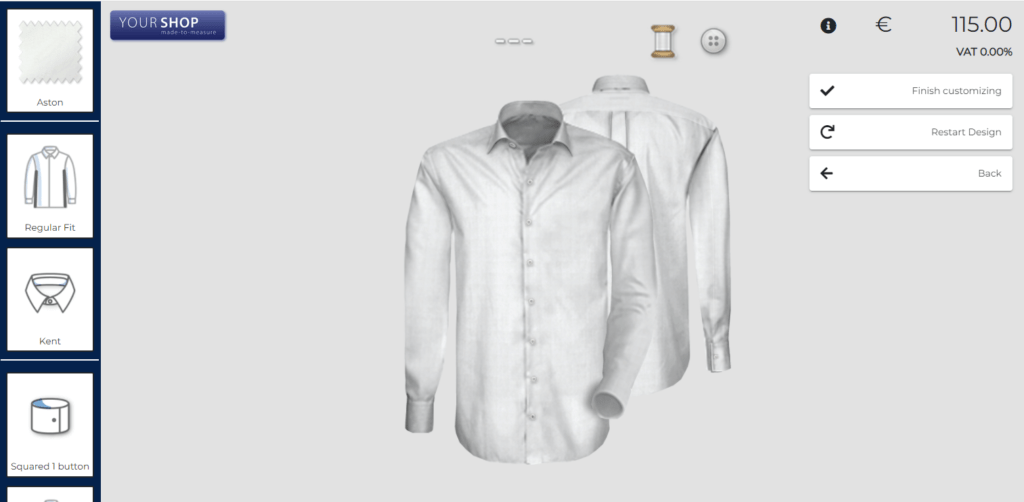
As you see in the below screenshot, we have an iframe in the custom page (template) (section 2)
We have some controls on the top right.
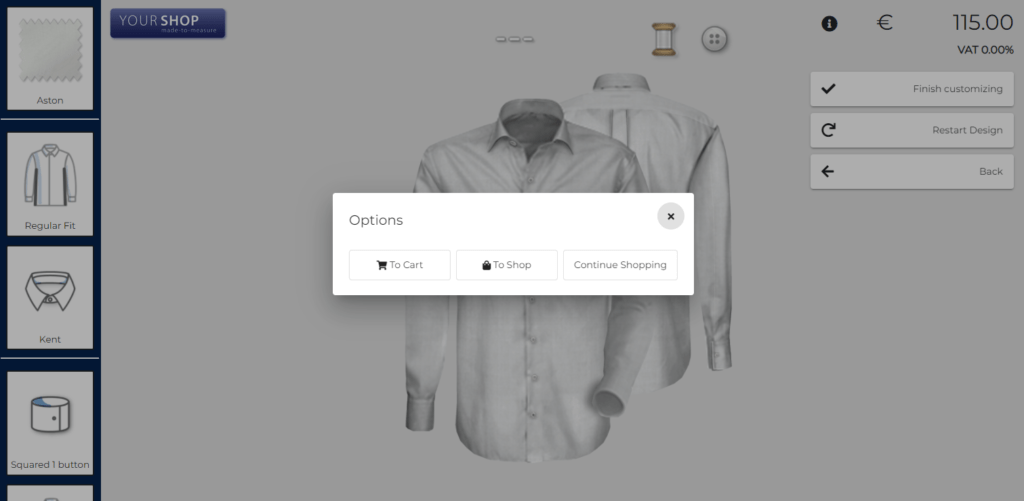
- Finish Customizing: Add this item to cart
- Restart Design: Reload this item as beginning
- Back: Back to Shop Page or Cart Page (we already mentioned in the previous section)
If end-user click at „Finish customizing„, inside the iFrame we will send an API request to POD system with the payload as below
{
  "itemId": "23", // provided as parameter from out side the Iframe (eCommerce) (section 4)
  "productId": "259", // provided as parameter from out side the Iframe (eCommerce) (section 4)
  "podMode": "b2c",
  "languageCode": "en",
  "sizeType": "s:52",
  "visualImages": [
	{ ... }
  ],
  "productDetails": [
	{ ... }
  ],
  "cartSession": "c4fd4b3c-0264-4ace-b14a-840d3ab7f993",
  "transactionId": "",
  "transactionStatus": "new",
  "visualizationMode": 1,
  "localCartSession": "c4fd4b3c-0264-4ace-b14a-840d3ab7f993",
}
Then the API will return back a response as below, we only have a look at the data property
- price: calculated in POD system based on the configuration
- visualization: a fully shirt image.
- transactionId: the transaction Id for the current item
- details: a list of selected variation from the shirt item
- itemId: from the payload
- productId: from the payload
{
  "message": "Add to cart",
  "code": 1,
  "data": {
    "price": 115,
    "visualization": "1fa91912-85c9-44dd-a89e-49a8792b5374.png",
    "transactionId": 210,
    "session": "23562-0264-4ace-2355-8402323d3993",
    "details": [
      {
        "text": "Fabric",
        "value": "Aston"
      },
      {
        "text": "Design Line",
        "value": "Regular Fit"
      },
      {
        "text": "Design sleeves",
        "value": "Long"
      },
      {
        "text": "Design Collar",
        "value": "Kent"
      },
      {
        "text": "Design Cuffs",
        "value": "Squared 1 button"
      },
      {
        "text": "Design Sleeve slit",
        "value": "Simple sleeve slit"
      },
      {
        "text": "Details Button catch",
        "value": "Simple button bar"
      },
	  ...
    ],
    "itemId": 23,
    "productId": "259"
  }
}
Then the Iframe will collect the essential data and post a message back to the cutsom page (eCommerce)
That mean in this case, we must register another event in the custom page to receive the data from the iFrame
<script type="text/javascript">
    window.addEventListener('message', function(ev) {
        var action = ev.data.action;
        if (action === 'cart') {
            window.location.href = '<?php echo $cart_url; ?>';
        } else if (action === 'shop') {
            window.location.href = '<?php echo $shop_url; ?>';
        } else if (action === 'open_video') {
            var value = ev.data.value;
            window.open(value.link, '_blank');
        } else if (action === 'add_to_cart') {
            var data = ev.data.value;
            console.log(data);
            // TODO: Add to Cart
        }
    });
</script>
Based on the response from the iframe, we have
- ProductId: from eCommerce’s product which we created in the section 2
- ItemId: from POD system, we already defined this value in the section 2
- Price: from POD system.
- Visualization: from POD system.
- Details: from POD system.
- TransactionId (tid): from POD system
- Session (tss): from POD system
Now we are able to add the selected product (product-id: 259) to cart and after that we must override and add some custom values for this product in the cart.
- Override the price from the POD system.
- Add a custom value to store the visualization. (used to show the product image in cart).
- Add a custom value to store the transaction-id. (used to edit item in cart).
- Add a list of custom values to store the detail. (used to show the summary)
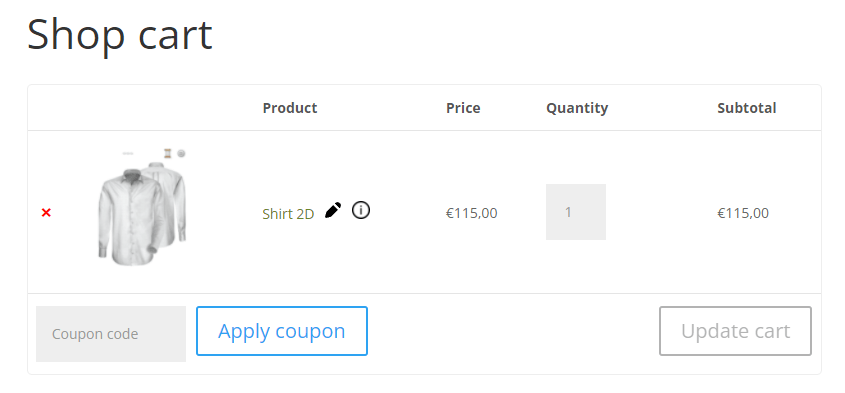
Finally, we have the result as below
- Visualization: built up by the response from POD and the visualization url in the setting page